Did you know that helping children learn shapes promotes a strong foundation for both math and literacy?
Identifying, categorizing, and creating shapes help young children gain mathematical reasoning skills in their early childhood years that will set them up for success later in school. It also builds background knowledge needed for learning the alphabet. (Who knew a triangle or a circle had so much power?!)
Teaching basic shapes is one of the most fun learning objectives for teachers and parents alike, in part because there are endless ways to do it! You can use anything and everything from wooden blocks to puzzles to magnetic tiles. Simple cutouts from construction paper or felt fabric also work great. If you can imagine it, you can do it. (And your child can, too!)
Young ones learn best through imaginative play and active engagement. So, as you think through when, where, and how to do shape activities with your child, keep in mind that the most effective learning occurs when children take an active role.
When to Introduce Shapes
It is never too early to introduce basic shapes, just as it is never too early to introduce talking, singing or reading.
Children begin learning about the world around them from as early as infancy. In the very early years, babies absorb information by watching and listening to the people and events in their sight. Young children are drawn to the contrast of black and white picture books – this is one great tool for teaching basic shapes to your very young child.
As they grow into toddlers and preschoolers; puzzles, blocks, magnetic tiles, and various arts and crafts activities are excellent ways to teach shapes. Children as young as two may be ready to learn basic shapes like circles, squares, and triangles.
Please keep in mind, though, that all children develop at different paces. The activities we will share provide entry points for children at all readiness levels – from pre-reading toddlers who know just a few words to elementary schoolers ready for enrichment.
Why Teach Shapes to Young Kids?
Shapes provide a powerful foundation for learning. Identifying, classifying, and creating basic shapes helps kids develop a strong basis for mathematical reasoning and literacy. They also help children learn across content areas because they:
- Provide an introduction to symbols
- Serve as a precursor to recognizing and differentiating among letters & numbers
- Teach symmetry
- Introduce patterns
- Present opportunities to practice comparison and classification
- Encourage mathematical problem-solving
- Organize & categorize visual images
That is a lot of learning!
Did you know your toddler is building a foundation for strong visual-spatial reasoning when she builds with her colorful wooden blocks? Your preschooler is learning to read not only by listening to stories and practicing with letters, but also by sorting shapes!
Teaching shapes should be an ongoing endeavor that both teachers and parents support. You can always be teaching and reinforcing basic shapes, even if you’re not sitting down for a special shape activity. Pointing out where you see prime shapes in your everyday life is a great place to start.
What Shapes to Start With
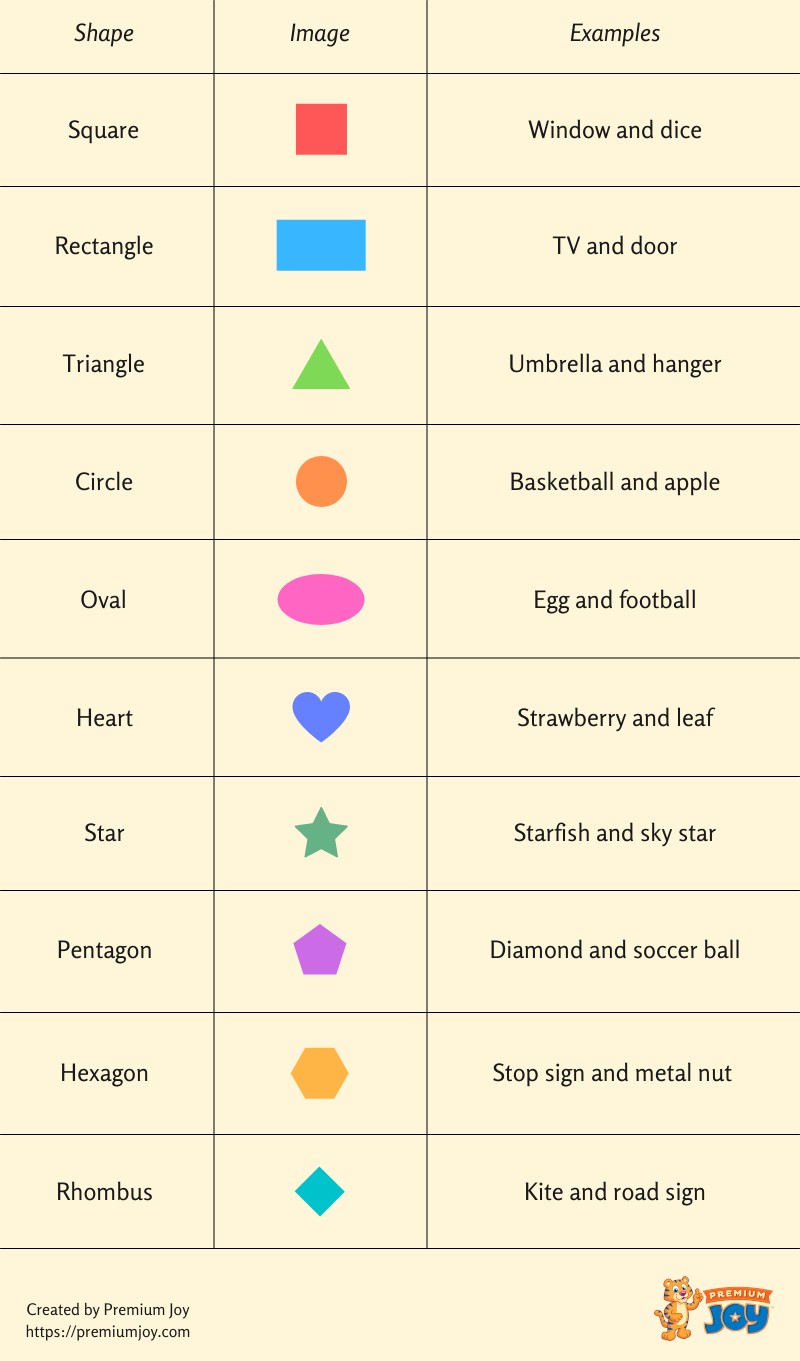
There is no universal rule about which shapes should be introduced first, second, third, etc. But, early childhood teachers typically begin with the most 2D familiar shapes. These include the circle, triangle, square, rectangle and oval.
These shapes are easy for kids to identify in the real world and through toys. As you go about your day, help your child notice the shapes as they occur naturally.
For example, the bottom of your coffee cup is the shape of the circle. Your kitchen window may be shaped like a square. The cereal box at the breakfast table is probably shaped like a rectangle. When you spend time noticing the shapes of common household objects, your child will begin to notice them, too. Encourage this! Celebrate this!
The different sizes and orientations of these “real world” shapes will help expand your young child’s mathematical thinking abilities. She will be able to recognize that not all triangles are equilateral, for example. Some rectangles are “tall” and others are “long,” and ovals vary in length.
Most children’s toys include basic shapes like circles and rectangles. They may be found in knob puzzles, picture books, coloring pages, and magnetic tiles. They may be in different colors and textures, but retain the same recognizable form. These basic shapes are a great place to start with your toddler or preschooler.
Other shapes with more complex attributes, such as hexagons and parallelograms, may be introduced later in elementary school or with younger children who show mastery of identifying and manipulating beginning shapes. As your child shows signs of being ready for more advanced shapes, be sure to use correct mathematical language (like angles, sides, and parallel) to help reinforce her teacher’s instruction.
Activities for Teaching Shapes to Kids
To help your child learn to identify basic shapes, try a variety of activities to engage her in active learning and imaginative play. If one activity seems to fall flat, no worries! Try another one. You are sure to find a few fun, hands-on activities that light up your child’s love for learning.
1. Sorting
One of the best ways to teach shapes is through sorting activities. You can use just about any toy or material to help children sort. Wooden blocks, foam blocks, and magnetic tiles all work great. Even cut-out 2D card stock shapes will be effective!
Modeling works for most children so they can see how to engage with the activity. Show them how to put rectangles in one pile and circles in another pile. Hold up a toy and look at it, and say:
“I see this shape is round. It must be a circle! I’ll put it in this stack.”
Then, hold up another toy, and offer a different observation,:
“This shape has corners. It’s different from the circle. I’ll put it over here.”
Take care to use age-appropriate math language, naming the shape and offering helpful observations about their attributes. This helps children build a foundation for math vocabulary and learn to compare visual images. After a couple of examples, let your child explore the toys or materials independently. It’s OK if he makes mistakes – that’s how children learn.
For very young children, it may be helpful to have all the circles be one color, all the rectangles a different color, all the squares another color. This will help reinforce the idea of “same” and “different” if some of the shapes are of different sizes. Your child will know a “fat” oval is still an oval if all the other ovals are blue and the shape he is holding in his hands is also blue.
2. Matching
Matching is another excellent way to help children learn shapes. Just like with sorting activities, you can use almost any toy or material for matching.
- Encourage your child to match puzzle pieces that are the same shape.
- Try matching felt, sandpaper, or cardstock cut-out shapes to promote multi-sensory learning.
- Use markers or crayons to color matching shapes in a shape collage on a coloring page.

3. Inset Puzzles
Inset puzzles with a variety of shapes and bright colors are a great way to help children become familiar with introductory shapes.
Many inset puzzles (especially knob and chunky puzzles) include the basic shapes like circle and square. They also come with more advanced shapes such as letters, numbers, fruits, vehicles, and animals.
As you work with your toddler or preschooler on these puzzles, be sure to say the name of the shape as you help or watch her manipulate the puzzle piece.
4. Magnetic Tile Shapes
Use magnetic tiles to help kids learn to orient shapes in different positions and create new, larger shapes from smaller ones.
Unfortunately, many children’s books and early teaching materials present 2D shapes in only one familiar position. When children see the shape in an ‘unusual’ position, they may struggle to recognize it as a shape they know because they don’t have a deep understanding of its properties.
For example, children might recognize equilateral triangles as triangles but be confused by right isosceles or obtuse scalene triangles, simply because they have never seen a 3-sided shape positioned with such angles. Of course, young kids will not know or understand the different mathematical names of triangles, but using a variety of materials (like magnetic tiles) to learn shapes lays a strong foundation for visual and spatial reasoning.
Playing with 2D magnetic shapes also helps children see how shapes can be rotated, reflected, and flipped.
- Long, flat rectangles can turn into tall, skinny rectangles! (And it’s still a rectangle!)
- Magnetic squares can be stuck together to make a 3D cube!
- Two magnetic squares joined together makes one rectangle!
And on and on go the possibilities for learning to see shapes in a broader context. Magnetic tiles are an open-ended toy that offer hours of imaginative play and learning fun for children of all ages.

5. Drawing
Never underestimate the power of a simple piece of paper and a pencil. Some children just love to draw.
If your child likes drawing, encourage them to practice drawing shapes. You may also provide a ruler or other straight edge to help them draw shapes with neat lines and perpendicular angles.
An older child may enjoy measuring the length of the sides of her shapes and creating shape-pictures, like robots or other objects made of recognizable 2D shapes.
For an extension activity, offer a challenge of creating a specific object, like an animal, made only of polygons, for example.
Alternatively, you could allow your kid to draw using chalk instead of a pencil. This is a quick and easy activity to set up that requires minimal adult intervention.
If needed, you can offer a few example shapes to help your child get started, and then sit back and watch how he creates. Maybe your child will make a field of flowers whose petals are made of ovals and stems are made of thin rectangles. Or perhaps your child will draw one ‘wobbly’ square and then scribble inside it. Either way is OK.
Note: some children may need extra help grasping the chalk or drawing lines if their fine motor skills are still developing.
6. Shapes Collage
This is a favorite activity for young children. A shapes collage is simply a compilation of shapes. Details can be filled in however you wish!
- Use stencils or stamps or free-hand drawing to create a collage of shapes on construction paper
- Pre-cut a handful of shapes and help your child glue them onto paper
- Use tissue paper and mod podge to create a textured collage (best for ages 5 and up)
- Make a color-themed shape collage to celebrate a holiday, such as a red, pink, and purple heart collage for Valentine’s Day, or black and orange circles and rectangles for Halloween
And if you’re in a hurry, you could buy some ready shapes for your kids to use to quickly create collages.

7. Playdough Shapes
Who doesn’t love playdough?
Toddlers love playdough. Preschoolers and elementary school kids love playdough. And lots of adults enjoy a bit of playdough play, too!
Whether you use die-cuts to stamp playdough shapes or free form play, this moldable magic offers endless opportunities to create shapes with your children.
Try making animals or food or tools or anything you wish. Of course the shapes won’t be perfectly straight or round, but you will still have plenty of opportunities to notice the shape and nature of your creations:
“Your worm looks like a very long, skinny oval!” or
“Your food truck is shaped like a squiggly rectangle!”
8. Sensory Tables
A sensory table is essentially any large bin that is filled with special sensory materials. Some of the more common fillings are:
- Water
- Soapy water
- Sand
- Dry beans
- Rice
- Dry cereal
- Dry pasta noodles
- Snow
- Whipped cream
- Shaving cream
- Even dirt
Choose any filling that suits your child and your own tolerance for a little mess. Then, find or create shapes that you can put into the filling.
One place to start it by putting cut-out shapes or magnetic tiles into a sensory table full of sand or dry rice. As you become more familiar with sensory play and how to manage materials, experiment with shapes of different textures, colors, sizes, and attributes.
The purpose of using sensory tables is not to practice memorization or recall but rather to encourage your child to engage all of her senses while increasing creativity and independence.
In case you don’t have a suitable bin to use, you may buy one such as this table.

9. Play Hopscotch with Shapes
Do your children get antsy after too much time indoors? If so, bring the learning outside!
Use chalk to create a simple hopscotch template on your driveway, sidewalk, or porch. But, instead of using numbers to fill in the squares, use shapes!
You can play hopscotch with shapes in as many ways as you can imagine. To start, try having your child simply hop from square to square and name the shape she lands on. Then, introduce a challenge by inviting her to hop only to shapes with 3-sides, or to make a pattern in her hops by moving from circles to 4-sided shapes.
When children invent the rules for their own play, they are more engaged and for longer periods of time. So, encourage your child to make up her own rules, too!
10. Geoboard Shapes
Geoboards are a great math tool for introducing length and width in 2D shapes.
Many early elementary school teachers use geoboards to help children learn to create their own 2D shapes with rubber bands around the individual pegs. Creating is a higher level of thinking than recognizing and naming them from a picture.
Geoboards are also a very helpful way to introduce the concept of perimeter and area.
If your child is ready for this kind of learning, go for it!
11. Printouts and Worksheets
While children learn best through play, there is a time and place for worksheets, too. It is important to be able to sit for a few minutes at a time and work on an activity with pencil and paper.
If your child is 5 or 6 years old or older, offer printouts from time to time to help them practice their shape identification and classification skills. They may practice writing the names of the shapes, drawing the shapes, sorting/matching the shapes or measuring the shapes.
Younger children (toddlers and preschoolers) can also work with basic paper to learn shapes. Instead of writing with pencils, try using shape stamps, or provide markers or paint to practice following instructions. Maybe they will color all the circles blue and paint a red dot in all the squares.
Conclusion
Teaching shapes can be a joyful, energizing activity for both adults and children.
With just a bit of planning, teachers and parents can introduce basic shapes to young children through a world of creativity and fun. Guided hands-on activities like play dough creations and shape collages are the best way to facilitate learning shapes for kids of all ages, especially the littlest ones!